Ghoulish Halloween Party Recipes
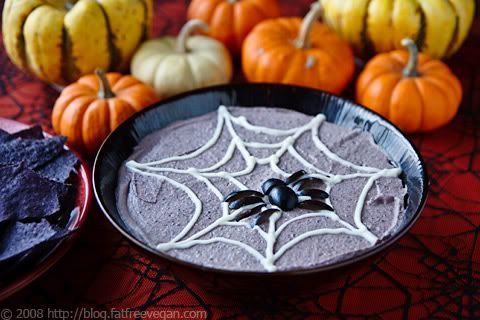
Spooky Black Bean Hummus
Ingredients
2 cloves garlic
2 15-ounce cans black beans, drained and rinsed
2 tablespoons tahini
3 to 4 tablespoons lime (or lemon) juice
1 teaspoon cumin
1/8 to 1/4 teaspoon chipotle pepper -- to taste
3 tablespoons soy yogurt (optional)
1/2 teaspoon salt (or to taste)
For Design: additional soy yogurt or tahini
Instructions
With food processor running, drop in the garlic cloves and process until finely chopped. Add the black beans, and process until pureed. Add the remaining ingredients (use the lesser amounts) and process until smooth. Taste and correct seasonings, adding more as needed.
Spoon the hummus into a serving dish, smoothing the top. Using a pastry bag and either soy yogurt or thinned tahini, pipe on the design. Place a plastic spider into the web, or make one yourself from black olives. Refrigerate until ready to serve.
Bat Chips
Ingredients
1 large flour tortilla per person
1/4 cup olive oil
Salt
Directions
Preheat your broiler. Using Halloween cookie cutters, cut each tortilla into bat and ghost shapes. Lightly brush both sides of each creature with oil. Arrange on a cookie sheet or jelly roll pan. Broil, flipping once when they begin to brown. When brown on both sides, lightly sprinkle with salt.
Enjoy!
Spicy Sandwich Halloween Cookies
By 265 Halloween
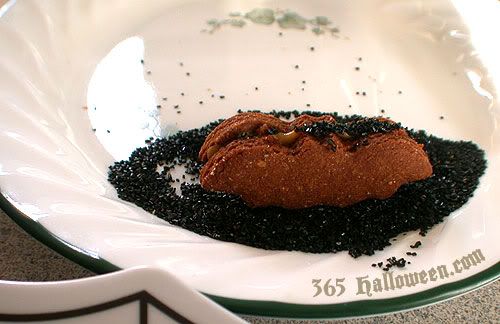
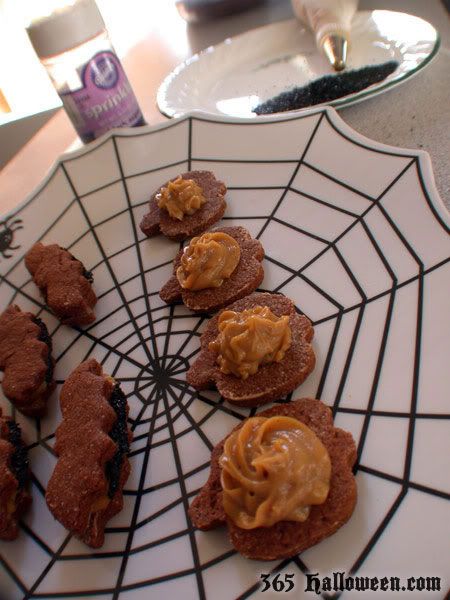
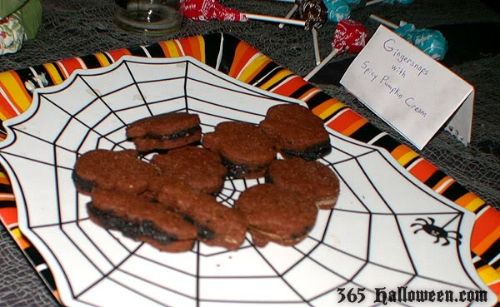
Like Leap Years, really delicious Halloween cookie recipes don’t materialize very often. As fans of the unusual, we decided to pair these 2 phenomenons together. Thus, we present to you the recipe for the crowd favorite dessert from last year’s Halloween party: Ginger Cookies with Spicy Pumpkin Cream Filling. They were a huge hit and were quickly devoured by guests. There are 2 options for preparing these Halloween cookies, based on how quick/easy you want them to be or how much sugar you want in them. The cookies are low sugar and can be eaten alone (as a drop or cut out cookie), but the addition of a spicy cream filling and black sugar topping can transform them into super sweet confections. We love them both ways, and you probably will, too.
Molasses Sweetened Ginger Cookies Recipe
Ingredients
* 3 c. unbleached flour (I like 1/2 spelt, 1/2 whole wheat)
* 2 tsp. baking powder (non-aluminum)
* 1 tsp. cinnamon
* 1 tsp. ginger
* 1/2 tsp. cloves
* 1/2 c. margarine (Earth Balance brand is great)
* 1 cup unsulfered molasses (use corn for lighter taste or blackstrap for a full-bodied taste)
* 2 Tbsp. maple syrup or unbleached sugar (optional, or try a sprinkle of stevia powder)
Instructions
Mix dry and wet ingredients separately then add together to form a thick, soft dough. Refrigerate for 20 minutes. Lightly grease cookie sheet with margarine. For cut out cookies, shape dough into 2 large balls and roll out on floured surface for cutting out. For drop cookies, roll into small balls and flatten with the bottom of a greased glass. 1/4″ thickness will produce crispy texture, and thicker cookies will be softer. If desired, sprinkle lightly with sugar before baking. Bake at 350F for 10 minutes.
While these are baking, you can make your spicy cream filling. Either use a pastry bag or drop spoonfuls of filling in-between the cookies. Optionally, you can dip the finished sandwich cookies in black sugar (which is plentiful around October) for an extra Halloween-y look. The “cream” thickens as it cools, so if you must refrigerate before piping it onto your cookies, let it warm up first or give it another whirl in your food processor.
Spicy Pumpkin Cream Filling (Optional)
(Originally posted at the PPK)
Ingredients
* 12 oz. firm silken tofu, thoroughly drained
* 1 c. pumpkin puree
* 1/4 c. cashew butter or cashews
* 1/2 tsp. salt
* 1/2 tsp. lemon juice
* 1 tsp. vanilla
* 1 c. sugar (or 2/3 c. fructose)
* 1 tsp. molasses
* 1 tsp. cinnamon
* 1/4 tsp. ginger
* 1/4 tsp. nutmeg
* 1/2 tsp. nutritional yeast (sounds weird, but makes a yummy difference)
* 2 Tbsp. cornstarch + 2 Tbsp. water
Instructions
Rinse and wrap tofu in cheesecloth or lint-free kitchen towel and drain it for a few hours. You can cut this time down to about 5 minutes by wrapping, then just squeezing the tofu. You want to reduce it down to 1 cup. This step is important to encourage a thick texture and reduce the soy taste.
In food processor or blender, whiz up the tofu until it is velvety smooth. If you are using cashews (instead of cashew butter) add those now and whiz again until smooth. Add the rest of the ingredients except the cornstarch/water mixture, and mix it again until smooth.
Mix up the cornstarch and water and set aside. Transfer the pumpkin cream to a saucepan and heat on low just until it’s warm. Stir in the cornstarch/water mix and stir constantly until the mixture starts to get thick, about 5 minutes.
Even if you mixed really well during this last phase, you will probably have a few tiny chunks. You have 2 options. Ignore them and your recipe is done! Or, if you are going to use a pastry bag to pipe this out then you should put it all back into the blender or food processor and whiz it up smooth again. Even itty bitty chunks can clog a small pastry tip. Then again, you could use a large pastry tip.
Let cool completely and watch it turn all custard-y.
Here’s a little proof from the party: about half way through the night there were only 9 cookies left from the 2 gigantic trays that we bought. Chow down!
Mummy Dogs with Green Goo
By 365 Halloween
A little bit of presentation turns "pigs in a blanket" into oozy mummy dogs! This is super simple and even healthy if you follow these suggestions. Normally this meal is plenty creepy on its own since hot dogs are made from scrap pieces of various species of dead animals. Eeeew. Just grab yourself a pack of veggie dogs (I prefer Mummy Dogs with Tofu Pups and Smart Dogs, some biscuit dough, and a batch of Green Goo and you’ve got yourself some yummy mummies.
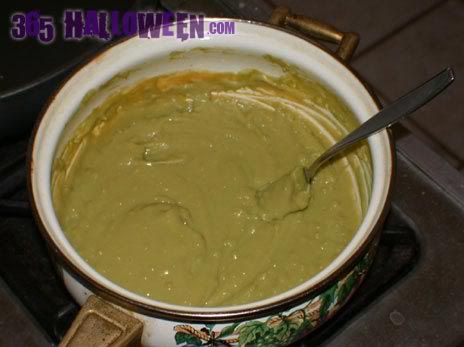
Step 1: Make the Green Goo sauce. Make a vegan "cheese" sauce
and add a natural green food coloring - puréed spinach works a treat and you won't notice the taste!
Step 2: Make your biscuit mummy wrapping. Either pop open a pre-made can (but really, check out those ingredients. Scary!) or make your own from scratch, using this recipe for Vegan Bisquits.
Step 2: Make your biscuit mummy wrapping. Either pop open a pre-made can (but really, check out those ingredients. Scary!) or make your own from scratch, using this recipe for Vegan Bisquits.
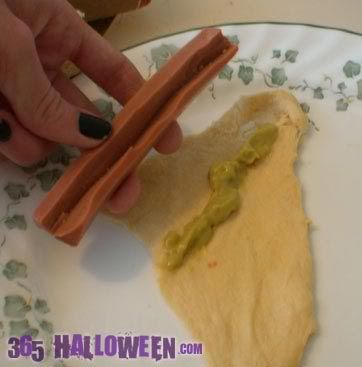
Step 3: Put it all together! I tried making slices in some of my veggie dogs to give the cheese plenty of room to goo around (see picture), but it didn’t seem to make any difference compared to the veggie dogs that didn’t have slices in them. So lay out your biscuit dough (a little bit goes a long way), lay down the dog, put a glob of Green Goo along the length of the dog, and wrap the whole thing up. Although it’s easier to just roll them up triangle style, it looked infinitely better when I meticulously wrapped the dough around several times to look like real mummy wrappings. Pull the dough until it’s thin and wrap, wrap, wrap. Make sure to leave room for the “face” to show so you can do a little decorating. I made slits for mouths and tiny holes for eyes filled with yellow mustard seeds. Pimento pieces for super creepy red eyes, or black mustard seeds would probably make excellent substitutes.
Step 4: Well, just bake them up! The cooking time for the biscuits should be sufficient, but recipes and hot dogs vary, so just keep an eye on them. Proceed to chomp down. Notice the creepy, yet delicious Green Goo that oozes from your mummy and be glad that such a holiday as Halloween exists : )
Enjoy!
Gingerbread Zombies
365 Halloween.com
Flesh chomping, brain biting, limb severing: why do zombies have all the fun? Now you can make your own edible little people and get some zombie revenge at the same time. With a little slicing and icing, simple gingerbread cookies morph into creepy yet delicious corpses for you to feast upon. And you don’t even have to resort to cannibalism!
Ingredients
1/2 cup sugar (or 1/3 c fructose; no other subs needed)
1 teaspoon powdered ginger
1 teaspoon cinnamon
1 1/2 teaspoons baking soda
1/4 teaspoon salt
1/3 cup molasses
1/3 cup soymilk (or other non-dairy milk)
2 1/4 cups whole wheat pastry flour
Instructions
Preheat oven to 275°F. Lightly oil two or three baking sheets with vegetable oil, then dust with flour.
Mix the sugar (or fructose), ginger, cinnamon, baking soda, and salt in a large bowl. Add the molasses and soymilk and mix well. Add 1 cup of flour and mix well. Mix in enough of the remaining flour to make a very stiff dough.
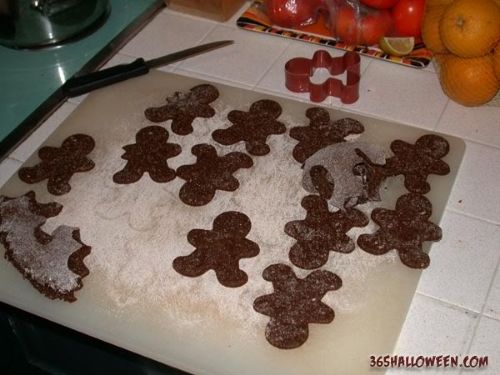
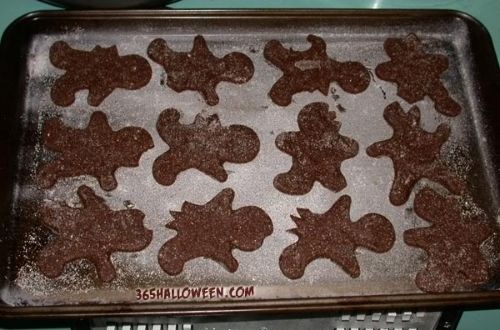
On a floured surface, roll a portion of the dough with a flour-dusted rolling pin to 1/8 inch thick (or even thinner if you like them crispy). Cut the dough into human shapes with a flour-dusted “gingerbread man” type cookie cutter. Using a knife, cut off legs, arms, chunks out of the head, etc. Use your fingers to further distort them, bending their necks and limbs at grotesque angles, making some limbs longer than others. Just try to keep a uniform thickness (about 1/8″) so they will bake evenly.
Using a spatula, carefully transfer the cookies to the baking sheets. Bake until the edges are dry and the centers give just slightly when pressed, about 20 minutes. Cool on a baking sheet for 5 minutes, then transfer with a spatula to a wire rack to cool. Once fully cooled, store in an airtight container. Makes about 48 cookies.
Use a standard “gingerbread man” type cookie cutter or anything that resembles a human. There are some “running man” shapes available that would probably be perfect. Then take a sharp knife and cut off legs, arms, chunks out of the head, etc.
Perpetual Kid now offers “ABC Gingerbread” cookie cutters that would work perfectly.
After you have transfered them to a cookie sheet, use your fingers to further distort them, bending their necks and limbs at grotesque angles, making some limbs longer than others. Just try to keep a uniform thickness so they will bake evenly.
After baking the bodies and letting them thoroughly cool, it’s time to add the details. Using a thick decorator’s frosting (loads of powdered sugar with a dash of liquid) in an icing bag and a small tip, pipe on some features and gore. With plain white frosting I added zombie features like exposed ribs, torn clothing, uneven or X-shaped eyes, and gaping mouths. A line of frosting around the edge gives it a more complete look. Then add reddish food coloring to the remainder of the white frosting and pipe on the gore (natural food dye in red/blue worked great; it gave an almost mauve color that looked more creepy than the standard Romero-red). Place “blood” on the edges of torn limbs or anywhere that you’ve inflicted damage upon your appetizing army of the undead. Exposed walnut brains are a delicious crowd pleaser; immediately place a walnut piece after adding a small pile of “bloody” frosting on the head wound.
Final step: remorselessly devour these gingerbread ghouls.
Halloween Pumpkin Cake
This one is *slightly* low-sugar, and truly low-sugar if you go frosting-free. Because we’re all busy shoveling candy into our mouths around this time of year, low-sugar recipes should be a staple in everyone’s kitchens. But don’t worry, it doesn’t taste low-sugar unless you eat it without frosting and even then it’s just not cavity-aching sweet.
Super Yummy Vegan Pumpkin Spice Cake (Vaguely Low-Sugar)
Ingredients
* 1/2 C soy margarine, room temperature (Earth Balance brand is the best!)
* 1 C brown sugar
* 2 egg replacers (I use Ener-G Egg Replacer or 1/2 c. applesauce, but other options abound!)
* 1 C fresh or canned pure pumpkin
* 1 tsp pure vanilla extract
* 2 C unbleached flour (I like spelt or whole wheat)
* 2 tsp baking powder (reduce to 1 tsp if using Ener-G)
* 1 tsp baking soda
* 1/2 teaspoon salt
* 1 tsp ground cinnamon
* 1 tsp ground ginger
* 1/2 tsp ground nutmeg
* 1/4 tsp ground cloves
* Plus any other spices that you like
* 1/2 C soy buttermilk (add 2 tsp vinegar to 1/2 C soy milk and let curdle)
Preheat the oven to 350F. Grease and flour two 8 inch cake pans.
In large bowl cream the soy margarine and sugar until light and fluffy (about 2-3 minutes). Add the egg replacer and mix well. Add the pumpkin puree and vanilla and beat until incorporated.
In a separate bowl, whisk together the flour, baking soda, baking powder, salt and spices. Add the flour mixture and soy buttermilk alternately to the pumpkin batter, in three additions, beginning and ending with the flour mixture. Pour the batter into the prepared pans and bake for approximately 30 minutes, or until a toothpick inserted in the middle comes out clean. Cool for 10 minutes and then invert and remove the cakes from their pans. Cool completely before frosting.
Frosting
I’m really not in love with any particular frosting, but I have some suggestions. To make this a full fledged low-sugar desert, you can use this refined-sugar-free (yet astoundingly delicious) recipe called Date Butter Frosting. I added coconut flakes instead of extract (since that’s what I had in my kitchen) and it was REALLY good. Another healthy yet decadant alternative is made with about 1 C raw nuts (cashew or whatever), 2 handfuls dates, carob or cocoa to taste, and a little fresh lemon juice and water. Oh WOW is that stuff good, and carob/cocoa goes so well with pumpkin. (You could then make the Pumpkin King design with powdered sugar.) If your idea of frosting is that “pourable” bizness, you might not appreciate these recipes. Everyone else, rejoice in the natural sweetness of dates! For the sweet teeth in the audience, and I must confess that I often fall into this category, you will want a cream cheese flavored frosting. Here’s one called Tofu Cream Cheese Frosting and another that is just called Dairy Free Cream Cheese Frosting. (Any kind of non-dairy cream cheese will do in that second recipe.) If you’re new to the whole “baking without animal-based secretions” thing, don’t be frightened! These recipes are all really good and taste marginally or no different than their non-vegan counterparts. You can even make your own dairy-free cream cheese, and concoct your own recipe from there. Get creative!
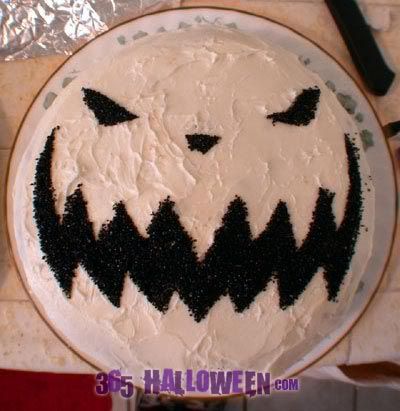
To create the Pumpkin King design
Transport the cake using toothpicks and foil. First frost your cake and let it sit for a little while so that the frosting forms a little skin. If it’s very wet the stencil will stick to it and try to ruin your design. You’ll then need the "Pumpkin King" stencil from Zombie Pumpkins. Trace that design onto some wax paper (or "freezer paper") and cut out the black pieces. Take your new stencil and lay it, shiniest side down, onto the top of the cake. Push lightly around the edges to get it to lightly adhere. Shake some colored sugar sprinkles (or something else if you’re feeling creative) onto the cake until there is a layer of sugar on every frosted surface. Carefully peel off the stencil, taking your time with the severe angles of the mouth.
To transport the cake (because this knocks the socks off co-workers, family, kids, and party-goers alike) place some short toothpicks or thin skewers into the cake at 3-5 spaced out intervals, and then delicately mold the aluminum foil around the cake and plate.
The only way a Halloween cake could look any better would be if it were in a spooky shaped pan.
Enjoy!
Animal Rights Links
Vegan Recipe & Cooking Links
Herbal & Garden Links
Martha Magenta's Poetry Links
General Topic Links
Enjoy!
Animal Rights Links
Vegan Recipe & Cooking Links
Herbal & Garden Links
Martha Magenta's Poetry Links
General Topic Links




No comments:
Post a Comment